Configuring RDMA with Mellanox NIC's and Windows Server 2016
Ariel Delgado. Posted 03/29/2017. Last Updated 03/29/2017.
In this blog, I create a basic test environment that makes use of the benefits of Remote Direct Memory Access (RDMA) on a Windows Server 2016 Environment. The steps I list below cover the required configuration for RDMA network transfers between two servers connected directly (NIC on ServerA directly connected to NIC on ServerB).
Below is a summary of configuration on ServerA and ServerB:
| ServerA | ServerB |
|---|---|
| Model: PowerEdge R730 | Model: PowerEdge R630 |
| NIC: Mellanox ConnectX-3 | NIC: Mellanox ConnectX-3 |
| Driver: 5.25.12665.0 | Driver: 5.25.12665.0 |
| IP Address: 10.10.10.1 | IP Address: 10.10.10.2 |
1) InstanceId
The servers are running the Datacenter edition of Windows Server 2016 and implement the Data-Center-Bridging feature available since Windows Server 2012.
DCB is a Quality-of-Service technology that provides hardware-based bandwidth allocation to a specific type of network traffic, and enhances Ethernet transport reliability with the use of priority-based flow control. Priority-based flow control is essential if the upper layer protocol, such as Fiber Channel, assumes a lossless underlying transport. See more info on the link below:
https://technet.microsoft.com/en-us/windows-server-docs/networking/technologies/dcb/dcb-top
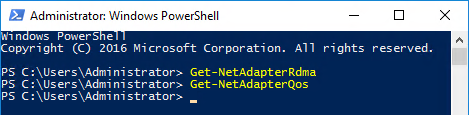
ou can verify RDMA over Converged Ethernet capability by running the Get-NetAdapterRdma cmdlet. A system with NICs that do not support RoCE will return nothing as illustrated below:

Whereas a system with RoCE NICs installed will display:
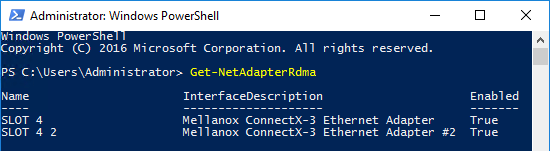
Also, notice that a system with NICs that do not support DCB Quality-of-Service (no RDMA), will not return any information when the Get-NetAdapterQoS is executed:
One more thing you can do to check for RDMA capability is to use the Get-SmbServerNetworkInterface cmdlet:
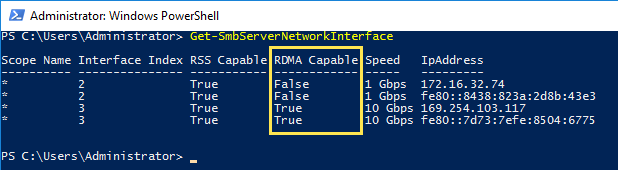
The “RDMA Capable” column lists whether your NICs support RDMA or not.
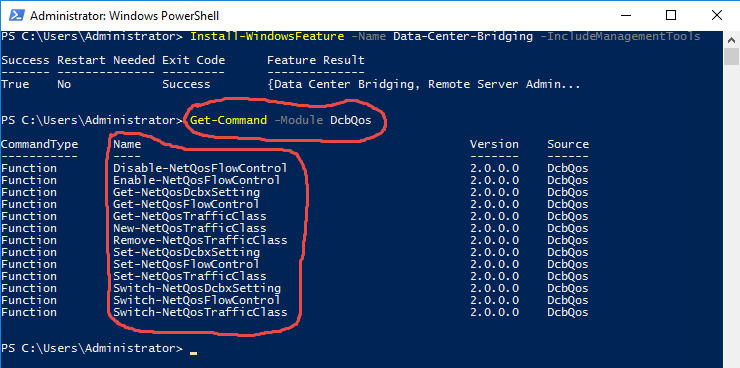
Notice that before installing DCB, there are no DCB cmdlets available to run in PowerShell:

We are now ready to load DCB features. Install the Data-Center-Bridging feature by running the below command in PowerShell:

This command, turns on priority-based flow control on the network adapters that support it and enables DCB management through WMI, PowerShell and Group Policy.
Notice that immediately after the DCB feature is installed, there are DCB cmdlets available to PowerShell:
Some background info: Classic Ethernet is a "best-effort" protocol in the event of network congestion. In its brute implementation, Ethernet will discard packets if the medium is too busy and will assume that a higher level protocol provides retransmission mechanisms.
Obviously some people can't live with that...so, very smart Engineers came up withFlow Control to solve this issue...and even smarter engineers came up with Priority Flow Control just because.
Simply put, Traditional Flow Control (802.3x) prevents frame loss in a highly congested network by "pausing" all data transmission on the wire for a specified period of time (enough to allow a receiver buffer to recover from its congestion). After this period of time has passed (and the buffer is no longer flooded), all data transmission is resumed on the wire.
Priority Flow Control (802.1Qbb) prevents frame loss in a highly congested network by only "pausing" data transmission of certain traffic types (class-of-service or CoS) for a specified period of time while allowing other higher priority traffic types to continue to flow uninterrupted during the same period of time.
Priority Flow Control, therefore, uses the values that can be defined by assigning "priority levels" (802.1p) to the frame in order to differentiate up to eight CoS's (Class-of-Service) that can be subject to flow control (pausing/resuming routine) independently.
The recommendation is that different traffic types should be assigned a "priority" based on the following:
| Priority Levels |
|---|
| 0 - Best Effort |
| 1 - Best Effort |
| 2 - Excellent Effort |
| 3 - Critical Applications |
| 4 - Video |
| 5 - Voice |
| 6 - Inter-Network Control |
| 7 - Highest |
Let's see this background in practice.
On our newly DCB-Enabled Server, notice what we get when running the Get-NetQoSFlowControl cmdlet:
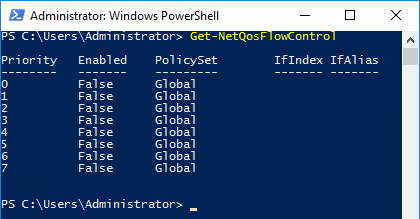
Notice that, by default, Priority Flow Control (802.1Qbb) is not enabled for any Priority Level (802.1p) on the Windows server side.
The very smart engineers recommendation is to assign a priority level of "3" to Critical Applications (such as iSCSI traffic, FCoE traffic, SMB traffic, Live Migration Traffic, NFS, Cluster Heartbeat traffic).
Its simple to test an RDMA implementation in Windows Server 2012 R2 and 2016 by configuring an SMB-Direct connection between servers "A" and "B".
In this example, Our "A"" server is a Dell PowerEdge R730 server running Windows Server 2016 and our "B"" server is a Dell PowerEdge R630 server also running Windows Server 2016.
So, let's assign a Priority Level of "3" to SMB traffic between server "A" and server "B". That way, Priority Flow Control PAUSE frames will be used only for traffic that matches this priority level (SMB traffic) whereas no flow control will be used for other types of traffic.
Let's do this.
Step 1 - Enable PFC QoS
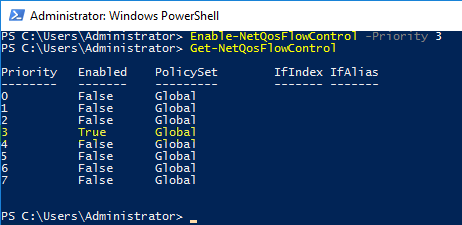
First We will tell Windows to enable Priority Flow Control for all traffic that has a "3" in its priority level tag:

We can confirm that Priority Level 3 will be using PFC by running Get-NetQoSFlowControl again:
Step 2 - Create a QoS Policy
It is now important to create a Quality-of-Service Policy. Think of a QoS Policy as:
"Instructing Windows to identify certain type of traffic, and also telling Windows what to do with that type of traffic it has identified"
So, in our SMB-Direct example, basically we need to create a Policy that instructs Windows to:
First, identify traffic of the type SMB and
Second, assigns the 802.1p Priority Level of "3" to the identified traffic type.
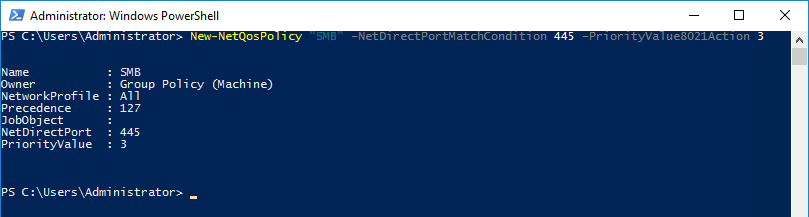
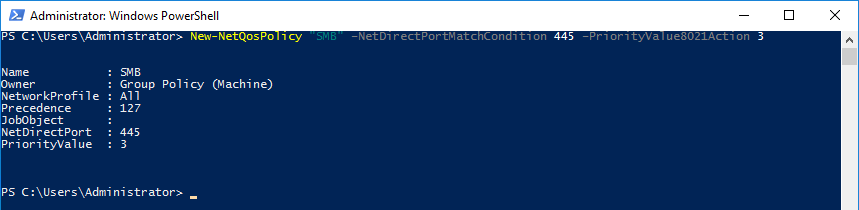
The following PowerShell command creates a QoS policy that identifies all traffic that reaches NetDirect port 445 (the default port used for SMB traffic) and then assigns it the Priority Level of "3":
Step 3 - Apply the QoS Policy
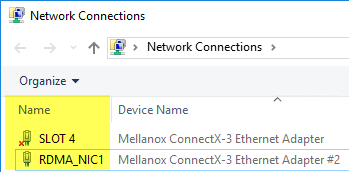
At this point We need to apply the policy that we just created in step 2 to the adapter (NIC) that will be handling our RDMA connection. This is accomplished by enabling QoS on the adapter (some adapters by default have QoS enabled) by using the Enable-NetAdapterQoS cmdlet. For this, We need the "interface alias" of the target adapter which we can get by using the Get-NetAdapter cmdlet in PowerShell or by looking at the "Name" column within the Network Connections console:

The syntax to apply the QoS policy would be:

This enabled QoS on the target adapter (in case it was not already enabled)
And now we need to create a "traffic class". See below.
There is a default traffic class created by Windows Server 2012 or later. You can see this default traffic class by using the Get-NetQosTrafficClass cmdlet:

Out-of-Box, all 8 priority levels are mapped to this default traffic class, which selects ETS as its transmission algorithm and has all of the total bandwidth. This means that, out-of-box, all types of traffic, regardless of the traffic's priority level, share the same bandwidth.
This default traffic class cannot be deleted. Only 7 additional traffic classes can be created.
So, in our SMB-Direct example, what we need to do is to create a traffic class that:
- 1) Claims all traffic of type SMB
- 2) Specifies which transmission algorithm it uses (ETS or Strict)
- 3) Specifies how much bandwidth of the medium is guaranteed to that SMB traffic
To do this:

So this command is telling Windows to grab all traffic that has an assigned priority level of "3" (which we determined earlier was all traffic of SMB type) and save 30% of the bandwidth minimum to this traffic:
This finalizes the required configuration in Server "A". However remember that RDMA requires configuration in all ends of the connection. Therefore we need to repeat the steps completed above in our Server "B".
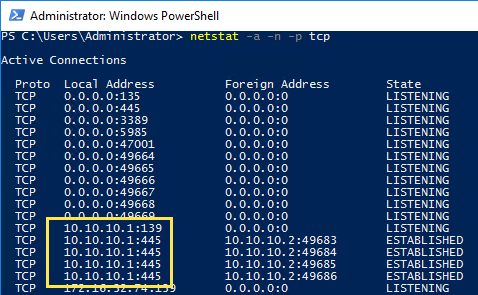
Remember that the physical connection from RDMA NIC in Server A and RDMA NIC in Server B in our example is a point to point link. A direct cable which is connected in our example. PING works. A regular \\ServerA\Share from ServerB works just fine. For instance netstat on Server A shows connections on TCP port 445 (SMB):
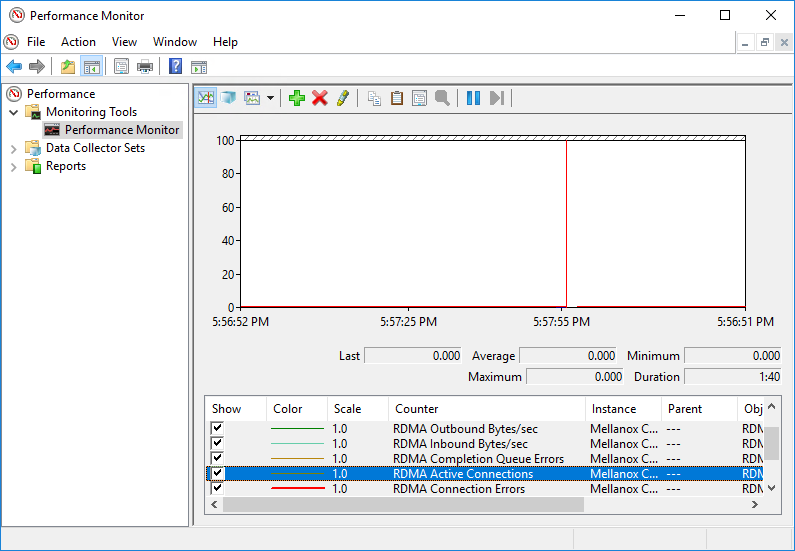
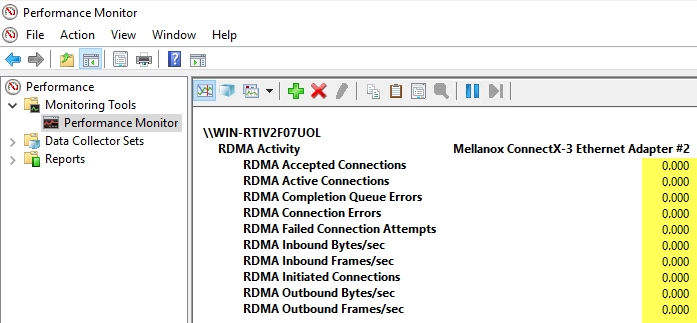
However, Examining the RDMA activity performance counters in ServerA reveals zero activity:
So let's repeat all previous steps this time on ServerB.
First - We need to install the DCB Windows Server features in ServerB:

Second - Enable Priority Flow Control for Priority Level "3"

Third - Create a Quality-of-Service Policy that identifies all traffic that reaches NetDirect port 445 and then assigns it the Priority Level of "3"
Fourth - Enable QoS on the RDMA adapter (if disabled) and create a traffic class that grabs all traffic that has an assigned priority level of "3" and save 30% of the bandwidth minimum to this traffic.
This should be all we need for now. Let's test to see if RDMA is working.
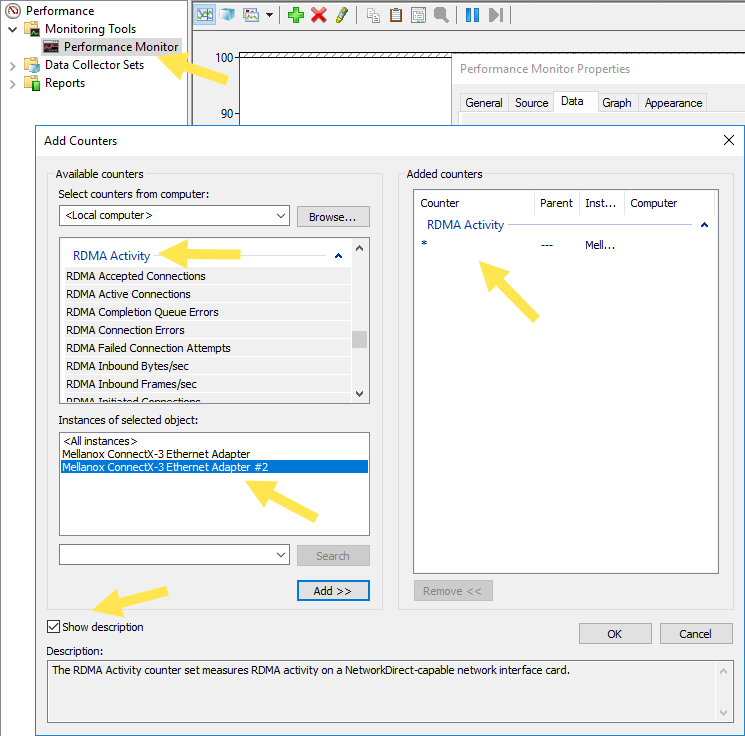
Let's use Performance Monitor to view RDMA activity. The screen belows shows the performance monitor counters that measure RDMA traffic. Add these to a performance monitor real time trace:
Let's use diskspd again. This time to generate som IOPS while monitoring task manager and performance monitor with the above counters in ServerA and ServerB.
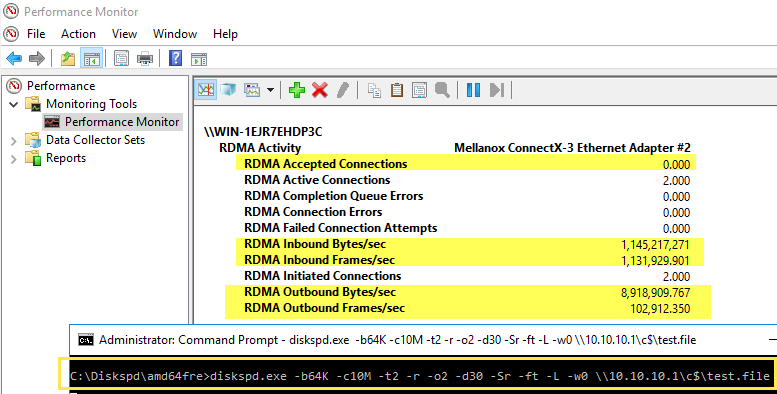
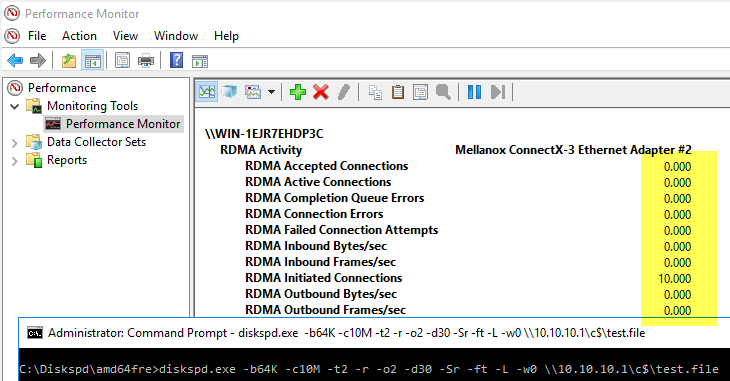
The test consists of running the below diskspd command and syntax from ServerB:
diskspd.exe -b64K -c10M -t2 -r -o2 -d30 -Sr -ft -L -w0 \\10.10.10.1\c$\test.file
So, when this command is executed on ServerB what it does is create a 10-megabyte file (-c10M) on the C:\ of ServerA (assuming that ServerB has SMB firewall/credentials access to ServerA) named "test.file"
DiskSpd will use 2 threads (-t2) to perform 100% READ (-w0) I/O operations with 2 outstanding requests (-o2) on this remote file using a block size of 64-KiloBytes (-b64K)
Other switches on the above command do the following:
- -r turns ON random I/O access aligned to the test block size (64Kb).
- -d30 runs the test during 30 seconds.
- -Sr disables caching for the remote file system while leaving the remote system’s cache enabled.
- -L measures latency statistics.
- -ft instructs the CreateFile File Management Function to avoid writing data back to mass storage if sufficient cache memory is available, because an application deletes a temporary file after a handle is closed. These switches (f and t) instruct the system to hold as much as possible in the system cache without writing and therefore may be of concern for certain applications.
Let's examine the RDMA counters with our configuration and using the above diskspd syntax on serverB.
Performance Monitor on ServerA:
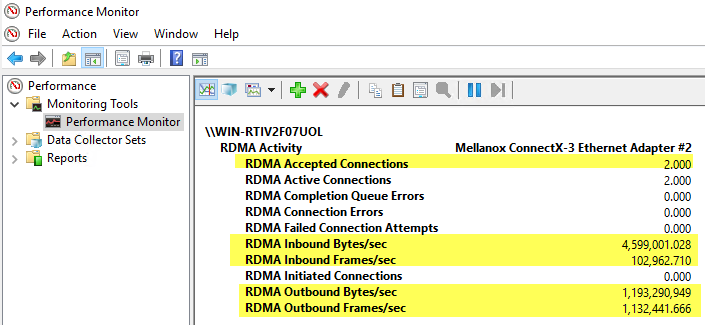
Performance Monitor on ServerB:
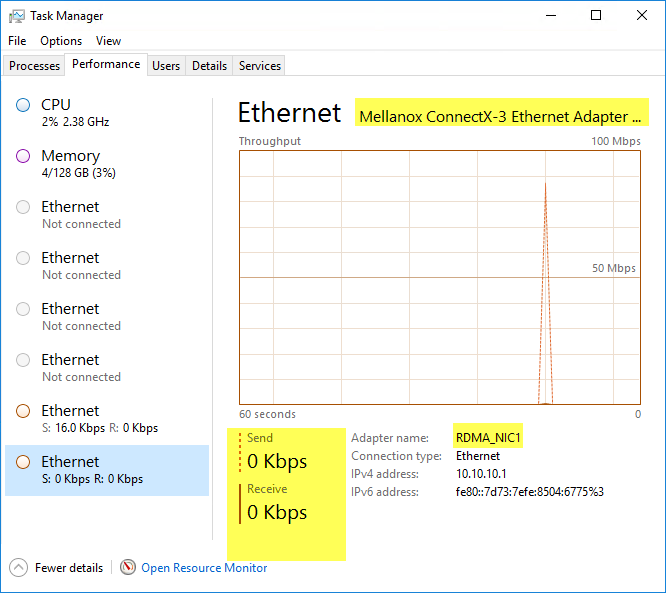
While the test is running, Windows Task Manager will not pick up activity on the sending/receiving NIC's. This is because OS workload is minimal when RDMA is working:
When the 30 seconds are complete, analyzing statistics in diskspd shows:
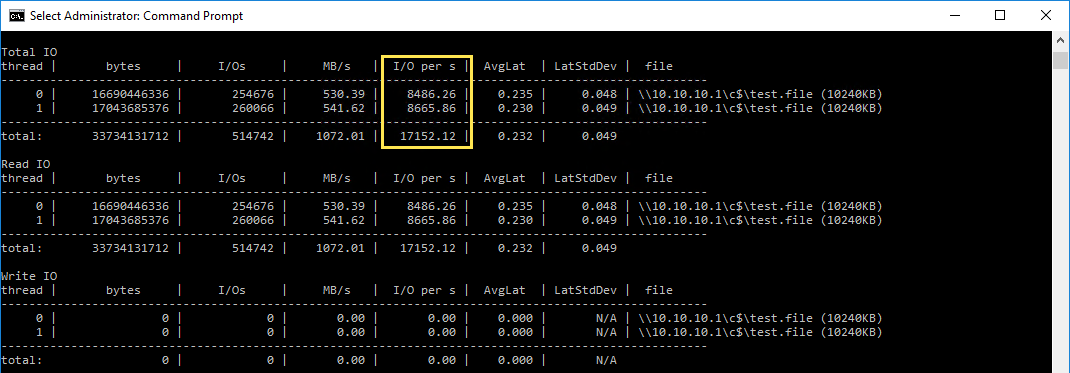
The above numbers may vary, of course, depending of disks speed and number, among other factors.
Let's compare these results after running the following cmdlet in ServerA to disable RDMA by running the Disable-NetAdapterRdmacmdlet either on serverA or serverB as illustrated below:

First, running diskspd with the syntax detailed above after disabling RDMA has no effect in the RDMA counters in performance monitor:
Performance Monitor on ServerA (after disabling RDMA):
Performance Monitor on ServerB (after disabling RDMA):
While the test is running, Windows Task Manager does pick up regular network transfer counters because RDMA is not being used:

When the 30 seconds are complete, analyzing statistics in diskspd shows this. Notice the drop in achieved IOPS:

This test concludes this blog. In a future blog I plan to discuss configuration steps for enabling RDMA through supported switches and also using Group Policy to complete the Windows Server side configuration. Thanks for reading.